More GnuCash tips

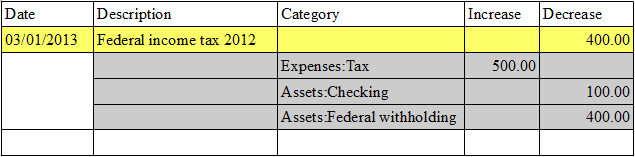
I’m continuing to learn more about GnuCash in order to use it more effectively.

Make the display a little less cluttered by removing the horizontal and vertical lines from the register view. Edit -> Preferences dialog, then the Register tab. Note the two checkboxes, Draw horizontal lines between rows, and Draw vertical lines between columns. Before:

with lines

After:

without lines

Transaction filtering

I’ve found this to be helpful when looking at a reimbursements account. I mark a reimbursement as cleared once I’ve received the money back from the company. Sometimes the reimbursements get cleared out of order because I have submitted them out of order. Then, when I submit my next reimbursement, I use transaction filtering to narrow down the display to just the un-submitted reimbursements.

How to filter transactions: View -> Filter By… Click the Status tab.

My beef with the summary bar

The summary bar appears above the status bar and includes information pertaining to the currently opened tab. On the main accounts page, it shows the grand total of all assets as well as the profit. The profit is calculated by subtracting YTD expenses from YTD income. Therefore, it gives a rough idea of how much money I’ve saved so far this year. However, I find this idea a bit misleading.

For example, it is August 2013. Lets say I will save $100 a month this year, by spending less than I earn each month. This is a monthly profit of $100, so at the end of the year, my profit would show $1200. However, let’s say that since April of 2009, I’ve been saving up to buy a car, and it will cost $5000. At the beginning of 2013, I had $4200 in my accumulation, and now in August, my accumulation fund has reached maturity. I buy the car for $5000. Suddenly the summary bar reports a profit of $-4200, whereas before it said $800. This is a little disconcerting.

In summary (pun intended) the summary bar’s profit calculation is not helpful for personal finance since it doesn’t help you know if you’ve stayed on budget. However, for other Tabs or Pages, such as stock accounts, the summary bar provides useful information, such as the current value of the shares held. So I wish there was an option to disable the profit calculation from showing, but keep the other useful information visible.

Advanced money tracking with GnuCash

In my last post, I wrote a review of GnuCash. Today I’d like to explain some things I’ve learned to track using this financial software.

Reconciling

When I receive a new statement, I first save the PDF to my hard drive. (Hard drive encryption mitigates some of the risk of having all those statements sitting on your hard drive.) Then I reconcile that particular account.

Adjustment account

The adjustment account is an expense account used to keep cash assets accurate. Cash transactions are hard to track, and sometimes my amount of cash on hand does not match the amount recorded in GnuCash. I periodically record this difference as an “Adjustment” expense.

Tax withholding

In the US, taxes get withheld from paychecks throughout the year. This tax withholding can be tracked in GnuCash. Each time you receive a pay check (or pay stub), create a split transaction. The gross wage is entered as income. This income will be split between several assets: some income goes to the tax withholding asset, and some income goes to the checking account (net pay).

When it comes time to pay taxes, the money in your tax withholding asset is used to pay your taxes. The taxes actually paid are an expense. There are two scenarios, and each can be covered by a split transaction:

  1. Your taxes are less than the amount withheld.
  2. Your taxes are more than the amount withheld.

Here’s an example for situation number 1:

tax-withholding

Multiple currencies

Peter Selinger has an excellent discussion of some of the general challenges of multiple currency accounting. The crux of the matter is: Under File-> Properties, go to the Accounts tab, and check “Use Trading Accounts.” This feature doesn’t have a lot of documentation, but it gets the job done.

Reimbursements

When you spend money on a reimbursable expense, you aren’t really spending your own money. You are eventually going to receive that money back, so to you it is an asset. (Not a very liquid asset.) See GnuCash Guide: Chapter 16.

Salary advance

When you receive a salary advance, you receive money you technically haven’t earned yet. This is a liability. You enter the salary advance as a credit to the checking account and a debit to the liability account. When future paychecks come that are reduced (because the company is using them to pay down your salary advance), you can also track this. Enter the paycheck as income, but instead of crediting your checking account, credit the salary advance liability.

Reimbursement advance

A reimbursement advance is money your company gives you to spend for a specific purpose. If you don’t spend it for that purpose, they will eventually need to make you pay that money, e.g. by lowering later paychecks. When you receive a reimbursement advance, you debit that liability and credit your checking account. You continue to record reimbursements by debiting one of your liquid assets and crediting the reimbursement asset. When you submit a reimbursement to clear the advance, you debit the reimbursement asset and credit the reimbursement liability instead of your checking account.

GnuCash: A Review

GnuCash is a tool for tracking your money that works on Windows, Linux, and Mac OS X. GnuCash has powerful features for tracking assets, liabilities, income, and expenses. Using GnuCash has helped me learn some more advanced accounting terms and concepts, such as double-entry accounting. I’m not going to explain those concepts here, as the GnuCash guide does a good job. Be sure to read both the help and the guide.

I plan to use GnuCash for many years to come. As my finances become more complicated, and my assets grow, by God’s grace, I need a tool to help me track my money. I’ve heard of other people tracking their money on spreadsheets, and I realize that if I did that, I would spend too much time trying to tweak the formulas. GnuCash has excellent data entry and reporting, saving me from writing these myself.

I consider GnuCash a compelling alternative to online finance tools, such as Mint, because it keeps my data secure on my personal computer. Of course, this raises its own risks, since there are many ways an adversary could access your data on your own computer. Still, I am more comfortable with these risks then the unknown risks of trusting the cloud.

Advantages of GnuCash

  • Using it will teach accounting concepts.
  • Register entry has powerful autocomplete and keyboard shortcuts.
  • Importing account transactions in QFX format automatically determines whether the data needs to be used to add a new transaction, or to reconcile an existing transaction.
  • The reconciliation window allows you to keep your accounts in sync with bank statements.
  • Included reports give a good overview of income and expenses.

Areas to improve

  • I wish color coding affected the accounts in the account list view, not just the color of their tab. Since I’ve heavily customized my accounts, the account list view can get longer than one screenful. Color coding would help me quickly spot a particular account.

Things still to learn

  • How to use the price editor for multiple currencies in an effective way.

Features I haven’t used

  • Budgets.
  • Recurring transactions. If I enter it manually, it reminds me that I am spending that money.

7 Habits: A Summary (part 2)

Habits 4-6: Paradigms of interdependence

  • The Emotional Bank Account describes the amount of trust that has been built up in a relationship. Interdependent relationships depend on the status of this bank account.

Habit 4: Think win/win

  • Win/win sees life as cooperative, not competitive. It is a way to reach decisions that are better than compromises.
  • There are other paradigms for making decisions (e.g. win/lose). Sometimes we are scripted with these paradigms, but we can change these scripts. (See habits 1-3)

Habit 5: Seek first to understand, then to be understood

  • We tend to listen autobiographically. We try to relate what the person is saying to our own experience. We should listen to their story before trying to clearly communicate our own story.
  • Listen to both content and feeling of what the other person is saying.

Habit 6: Synergize

  • Value the differences. Your motive for valuing the differences is that they will lead to creative win/win solutions.
  • One example of a difference: logical vs. creative thinking (right-brain vs. left brain)

Habit 7: Sharpen the saw

  • Sharpening the saw increases your personal PC (your ability to produce results)
  • Four dimensions of renewal: physical, spiritual, mental (these relate to habits 1-3, your ability to be independent); relational (this relates to habits 4-6, your ability to be interdependent)

7 Habits: A Summary (part 1)

The 7 Habits of Highly Effective People: Powerful Lessons in Personal Change
Stephen R. Covey
2004, Free Press

Introduction: The 7 habits are based on the following principles

  • P/PC Balance: P is production (the results of your work), PC is production capacity (your ability to produce results). If you neglect PC, you will never get P.
  • Maturity continuum: People grow from dependence to independence to interdependence. Interdependence is the idea that independent people come together to cooperate and create something greater.
  • The first three habits will bring growth in independence, and the second three habits will bring growth in interdependence.

Habit 1: Be proactive

  • You can choose how you respond to situations around you.
  • You may respond based on a script, that is, how you responded in the past, e.g. based on child hood experiences of pain. However, you can rewrite that script.
  • People who aren’t proactive complain about their circle of concern. Proactive people intentionally expand their circle of influence.
  • Habit 1 is personal vision. The vision is that you can proactively write a new script, no longer reacting to your past or other people.

Habit 2: Begin with the end in mind

  • Write a personal mission statement that governs your day to day decisions.
  • Leadership vs. management: Leadership is doing the right things (things that correspond with a goal or vision). Management is doing things efficiently. It is possible to be doing the wrong thing very efficiently. e.g. hacking your way through the jungle, but you find out you have been going the wrong direction.
  • Habit 2 is personal leadership. Your mission statement ensures you are doing the right things.
  • When writing your mission statement, ask: what is my life centered on.

Habit 3: Put first things first

  • Urgent vs. important. Many people live their life doing the urgent things, assuming that they will do the important things. This leads to burn out, and you will miss important things that are not urgent (e.g. relationships with people, spiritual growth)
  • Planning your schedule on a weekly basis will help fit in important things that aren’t urgent. Does your time management tool allow you to test agenda items against your mission statement?
  • Delegation is important in managing your own schedule. Gofer delegation gives the person a lot of instructions, but doesn’t build their PC. Stewardship delegation allows them the freedom to choose how they will complete the task.
  • Habit 3 is personal management. That is, effectively doing the things that, in habit 2, you determined are the right things to do.

Some personal examples

It’s easy to see the principle of P/PC Balance at work. One example is getting enough rest. When I rest, I am working on my production capability. If I am always producing and never resting, eventually I will be forced to rest. Another example is purchasing a new tool. When I bought a new laptop, it increased my production capability for working on school projects.

Personal leadership is the idea of making sure you spend your time doing the right things. You write a mission statement and choose a set of principles to live by. I wrote the role of a computer scientist when thinking about principles to live by.

Random number generation in Python and C++

When I was writing my evolutionary computing program in Python, I often wondered what would have been different if I had used C++ instead. Execution time would be faster, but development time would be slower. In this post, I’ll compare the performance of the two languages in a program I wrote that simulates 100 million coin flips.

I wrote the first version of the program using Python. Python is a good programming language to use for statistical simulation because it has a built-in random library which implements the Mersenne Twister. I executed this version of the program in both Python 2.7.2 and PyPy 1.7. PyPy is an alternative Python interpreter with improved performance. The Python code can be executed using the different interpreters without modification.

I wrote the second version of the program using C++. C++ has a simple random number generator, rand(), which should not be used for any serious statistical simulation. I used two libraries that implemented the Mersenne Twister. My first C++ version uses the GNU Scientific Library (GSL). I was helped by the GSL documentation and by the GSL example in this post. My second C++ version uses the new random number capabilities in C++11. I was helped by this example of uniform_real_distribution. The C++ code can be executed using the two different libraries by changing a few declarations and function calls.

Here are the results of running the code on my desktop computer:

Version Time
Python 23.9 s
PyPy 6.3 s
C++ using GSL 1.8 s
C++11 21.7 s

So assuming I’m not using C++11 incorrectly, it seems that it has really poor performance. There is a decent performance boost when using PyPy over native Python interpreter. But GSL does the best of all.

The files are available in this github repository.

New laptop

I just received a Samsung Series 7 Chronos NP700Z3A. In short, it is a really nice piece of hardware, though the software is a bit of a pain to work with Ubuntu. I’ll write more about that later.

What I like best so far is the high resolution screen. It is a 14″ 1600×900, which is about 132 pixels per inch (PPI) according to the PPI calculator. This is higher than the typical computer screen, at 90 PPI. However, it is much lower than, for example, the screen resolution of the new iPad, which has about 260 PPI.

It came with Windows 7 Home Premium SP1. I ordered it from the Microsoft Store, so it has Microsoft Signature, which means it isn’t loaded with bloatware or other nonsense. It is quite nice to receive a new machine and not have to de-install a lot of “helpful” software. I did a little price comparison and the Microsoft Store was $50 cheaper, plus it had free shipping, and I received a $200 credit for the store. So overall I feel like it was a good deal.

Of course, the first thing I did when I booted it up is install some useful programs. These include some utility programs:

  • Mozilla Firefox
  • Dropbox, to sync my documents from my other machine.
  • KeePassX, for my encrypted password database.

Also some programs to edit my documents in Dropbox:

  • LibreOffice
  • Notepad++
  • Dia, which I am currently using for UML diagrams in computer science class

And some additional programs for computer programming:

Keep WordPress speedy by resizing images

When you upload an image to WordPress, it is stored in its original size on the web server. WordPress allows you to specify an image size. WordPress will create an additional copy of the image at that size and insert that in the page instead.

Here is an example:
Original size: 1858×1233 (652 kB)
Wordpress copy: 1024×679 (336 kB)

This means that when people view your page, they have to download 0.5 times the original file size. This is a smaller file download, and it will help your page load faster.

Point to remember: If you choose a size when you insert an image, it tells WordPress to create a smaller file download. This will help your page load faster.

Resizing images

After inserting an image and viewing the page in a web browser, usually you’ll find that your image is too large. So then you go in the Edit Image window and set a smaller size, e.g. 70%:

This presents a problem: If you use the Edit Image window, WordPress will not automatically resize your image file a second time. It will only display the image smaller. This means that the web browser is still downloading the full size file, but it is just viewing it smaller.

I tried resizing the cabbage image above to 70%. Here is what happened:

WordPress size: 1024×679 (336 kB) — Recall that this is due to our choice of size in the Insert Image box.
New size at 70%: 717×475 (336 kB) — But this image could be 186 kB if I resized the actual file.

See the difference? If you resize an image with the Insert Image box, it will actually save space, but if you resize an image with the Edit Image box, it will not actually save space.

Conclusion

Correctly scaling your images before inserting them into a post will solve this problem. If you are going to be inserting a lot of images, use a test image. Insert a single image and use the Edit Image box to find out what size looks right. Then on your computer, resize all your images to this size before inserting them into the post.

Misc notes

Another thing you have to take into account when viewing images is the maximum width of the content in your theme. For example, this blog (bobbyratliff.wordpress.com) uses the Twenty Eleven theme, where the maximum width is 585. Even if I choose the 1024×769 option, the image width is limited to 585. In other words, it will show the cabbage image as 570×377.

Another solution is to add image sizes to the insert image dialog. If you have hosted WordPress, you can use the Additional image sizes plugin to do it.

Google Page Speed is a great tool for troubleshooting slow sites. It has a list of rules that it evaluates your website against. When your page breaks a rule, it will tell you why and give some clues on how to fix it. The information in this post applies to the suggestion “Serve scaled images.”

Computer animation project

One of the fun results from my computer graphics class last semester was our computer animation project. The assignment was to model the firing of a cannon, including the cannon recoil and the projectile’s parabolic trajectory. The end goal was to use this model to drive a 3D animation.

I worked with 2 other group members, and in all I spent 54 hours in group meetings and coding individually. The project resulted in about 4000 lines of code in 34 Java files.[1]

Physics modeling

For each frame of our animation, we make slight changes to the position of each object on screen. These small changes are based on simple physics calculations.

For example, for a wheel to roll to the left, it needs to both rotate counter-clockwise and move to the left. The angle of rotation \Delta\theta is related to the shift to the left \Delta s by the following equation:

\Delta s=r\Delta\theta

where r is the radius of the wheel.

Firing the projectile gives the projectile some initial velocity. This velocity can be used to compute a change in position for the projectile. The velocity changes over time due to acceleration due to gravity.

2D animation

First, we produced a 2D animation of this model. This involved several steps:

  1. Read in 3 objects : the projectile, and the wheel and the barrel which make up the cannon. These objects can be drawn on-screen in a certain order so the layering appears correct
  2. Move them to their initial position.
  3. For each screen refresh, update the positions of the objects based on the equations.

Initially, the projectile has 0 velocity, so item #3 above really means that nothing will change in each screen refresh. As soon as the user presses the fire key, the projectile is given a fixed amount of velocity (and the wheel is given an amount of recoil velocity).

3D animation

Making the 3D animation was the more challenging part of the project. While the 2D animation was written in about 10 hours, the 3D animation took 44 hours to write, including a 13 hour rabbit trail. I spent about 13 hours working on a version that ended up not working.

The 3D animation extends the work of the 2D animation. Instead of a 2D wheel, barrel, and projectile, we now have 3D objects. These objects are first generated and then stored in .dat files. There are now 6 objects: the ground, 2 wheels, the axle, the barrel, and the projectile.

Based on the source code from our textbook, the 3D objects are put into a scene which can be viewed from different perspectives. We added code to rotate and move individual objects based on the amounts specified by our physics model.

Here is a demonstration:

The video demonstrates two methods of rendering that our 3D cannon animation supports. The first is z-buffering, and the second is hidden line elimination. These two methods are described in my first post about computer graphics class.


[1] This is a raw count, produced by doing wc -l *.java. Not all 4000 lines are original code for this project. Some of this code was first implemented in our textbook,  Computer Graphics for Java Programmers, 2nd ed., by Ammeraal and Zhang. There are also 6 Java programs for generating the data files for the various on-screen objects. These Java programs have a lot of code duplication.